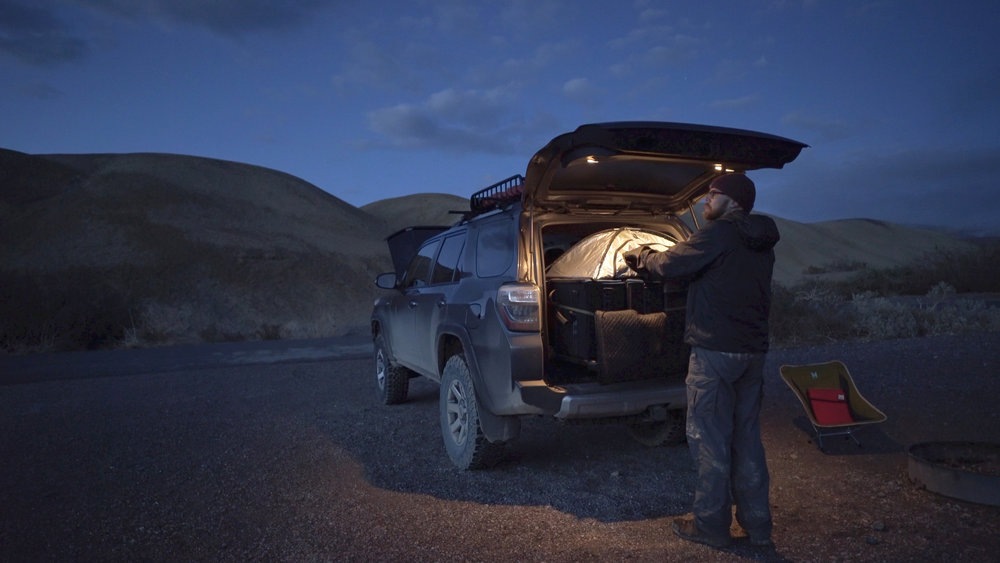
Loading 8x10 Film using a Harrison Film Changing Tent in the back of my Toyota 4Runner while camping in Death Valley.
Large Format Accessories
The camera, lens, and tripod are only the start of what you will need to carry as a large format photographer. You will also need to have film holders, a film changing tent, a dark cloth, a light meter, cases and filters. This section contains the vital equipment that I haul with me into the field. I will be expanding this section as the days and months go by, but this is a list of the core accessories that I find to be most important.
Film Changing Tent
Loading film out of the back of my 4Runner on a chilly winter morning in Zion National Park. I use the same film changing tent both in the field, and at home when loading film before a trip.
Harrison Film Changing Tent
Loading film is monotonous, and annoying, but it is also one of the most important parts of shooting large format. You need to stay organized, and have a clear mind when loading and unloading film. There have been times that my mind drifted, and I forgot to load fresh film into a film holder after emptying the exposed film.
An essential piece of equipment when loading film is a proper film changing tent. With 4x5, you can get away with a film changing bag, but 8x10 will require a tent because of the size of the film. There are many solutions on the market, but my favorite is the Harrison Film Changing Tent. I use the medium sized version, which is a good size for loading film both at home, as well as in the field.
4x5 Harrison Film Changing Tent at B&H
Dark Cloths
Though it seems simple enough, don't underestimate the value of a high quality dark cloth. In addition to allowing you to see the ground glass, many dark cloths also allow you to shield the film holders from direct sun, and even allow you to operate the camera in the rain. I own two different dark cloths, and will use one or the other depending on the situation. Do yourself a favor and buy a proper dark cloth rather than using a jacket, pillowcase, or something else. It will make the process much simpler, and perhaps allow you to use the camera in adverse conditions.
Shown above is the BTZS Focusing Hood attached to my Arca-Swiss F Metric 8x10 camera in Death Valley National Park. This dark cloth is compact, fits the camera very well, and even functions well in the wind.
BTZS Focusing Hood
Although there are several dark cloths that I use, my favorite is the Beyond the Zone System Dark Cloth. It is a very simple design that attaches to the back of the camera with elastic, and can be fully closed with velcro so light reflecting off the ground doesn't reach your ground glass. The inside of the dark cloth is made of a black synthetic material to help keep things dark, and the outside is a white rubberized coating to reduce heat. As an added bonus, the dark cloth can double as a rain cover when not being used for its intended purpose. If you would like to be able to use the camera while it is protected from the rain, check out the Harrison Silver Classic Dark Cloth listed below.
Buy BTZS Dark Cloth at the View Camera Store
The Harrison Silver Classic Dark Cloth serves a double purpose, allowing you to fully operate your camera in the rain. In this photo, I am setting up my camera in a gentle rain before sunrise in Death Valley.
Harrison Silver classic
There are times when a more classic dark cloth design comes in handy. The Harrison Silver Classic Dark Cloth from Camera Essentials allows you to insert film holders and use the camera while it is still covered in the dark cloth. This helps to avoid any accidental light leaks. It also allows you to fully operate your view camera in the rain. This is something I put to the test on my Winter 2018 trip to Death Valley. I was able to setup my camera, insert film holders, and make exposures while the camera was fully protected.
The front of the dark cloth has both elastic and velcro, which allows you to secure it to the camera. On a sunny day, you can hold the bottom of the cloth to help precent light leaks. The underside of the dark cloth is a soft black material that feels like cotton, and the outside is a water resistant silvery material that helps to reflect light, as well as protect the camera from rain.
Buy 4x5 Harrison Silver Classic Dark Cloth at B&H
Buy 8x10 Harrison Silver Classic Dark Cloth at B&H
Film Holders
Toyo-View Film Holders
Strong, Dependable, Built like a Tank.
The vast majority of my film holders are made by Toyo. I purchased all of these film holders new, and have never had any light leaks, or any other issues. When these film holders are brand new, the dark slides are a bit stiff and they can be a bit difficult to insert, but they break in with time.
The dark slide tabs are black on one side, and silver on the other. The silver side has a series of circles punched into the metal so you can feel which side is which when loading/unloading film in the dark.
It should be noted that since these film holders are so well built, they also have a bit more weight than the holders made by Chamonix, as well as the now discontinued holders made by Fidelity Elite I am very satisfied with my Toyo holders, and definitely recommend them. It should be noted that the 8x10 holders are sold individually, and the 4x5 size comes in a two pack.
Chamonix Film Holders
Lightweight, Beautiful Construction
In 2017, I added 4 Chamonix 8x10 film holders to my kit. The purpose was to reduce weight when going on backpacking trips. I have been very impressed with the holders so far. They are absolutely beautiful, and have a smooth satin finish.
The Chamonix film holders feature a very unique carbon fiber darkslide. In addition to the dark slide being a bit lighter than a traditional composite darkslide, the Chamonix darkslide is also far more rigid. In my experience, this makes it easier to insert and remove the darkslide while in the field.
At first, I found the Chamonix film holders to be a bit more difficult to load, but I am now accustomed to it and the effort seems to be about the same as using a Toyo Holder.
My only complaint about the Chamonix holders is that the darkslides are not labeled by sight or feel straight from the factory. Most companies will design darkslides with a black or white tab on either side of the dark slide, as well as some sort of bumps or ridges. This way you can stay organized and know if you have fresh film, or exposed film on each side of the film holder.
To resolve this, I simply cut some white labels, and stuck them on one side of each darkslide. This allows me to tell based on sight and feel if that side of the film holder is unexposed or exposed.
Overall, I am very satisfied with the Chamonix holders, and will likely buy some more later down the line if I have a need to carry more film.
If you would like to purchase Chamonix film holders, or any of their awesome cameras, please reach out to Hugo using the following link.


Light Meter
Sekonic L-758DR or L-558R
The first light meter I owned was a Sekonic 358. At the time, I was using it for studio photography. It was a great meter, but did not have the ability to spot meter a scene.
This is absolutely vital when shooting landscapes on large format film. I then purchased a used L-558R and used that for about 7 years. I really enjoyed the meter, but have since upgrade to the L-758DR because I found one for a deal that was too good to pass up.
In terms of functionality, the L-558R and L-758DR are mostly the same. Both meters allow incident meter readings as well as spot meter readings. They also both allow you to store multiple readings in memory, and average them. The memory and average feature in particular is something I find absolutely vital when metering a subject.
It should be noted that both the L-558R and L-758DR models are now discontinued. If you are in the market for a meter, I would search out one of these meters on the used market. The current version is the L-858DU which is also a great meter, but has gone to a color touch screen that can be more difficult to read outdoors. I very much prefer the simplicity of the L-558R and L-758DR.
Lens Hood
I learned early on the importance of using a lens hood. In 2010, my camera was perched on the edge of a cliff at a remote viewpoint along the Grand Canyon's North Rim known as Toroweap. I was photographing a sunrise with my camera facing toward the sun, though there wasn't any sky in the composition. I knew I had to shade the front element from the direct sunlight and I didn't have a lens hood at the time. To take the photo, I braced myself at the edge of the cliff overlooking a multi thousand foot drop, and held my hat out over the edge to block the sun.
It was after that trip that I purchased a Lee Wide Angle Hood for use with my large format lenses. This is a very unique bellows-style hood that will adapt to work with wide angle or even longer lenses.
A rear view of my Lee hood which is a combination of their Wide Angle Filter hood with 2 slots, and their Push-On 100mm filter holder. This way the hood fits around the outer barrel of my large lenses.
The Lee Wide Angle Filter Hood attached to my Nikkor-W 300mm 5.6 Normal Lens with it's large 95mm filter diameter.
Lee Wide Angle Hood
The Lee Filter Hood has two integrated filter slots for their 100mm system of rectangular filters, and meant to be used with their system of adapter rings. However, my most commonly used lenses have a 95mm filter thread which is larger than the hood is designed for.
The solution is to buy both this Hood, and Lee's 100mm push-on adapter, and combine them to make a franken-hood-filter-holder-thinggy. To do this, simply remove the 4 screws that hold the hood to the filter adapter, and swap out the filter holder for the Lee 100mm push on filter holder. This filter holder fits around the outside of large format lenses with a 95mm filter thread, meaning I can use it on both my Nikkor 150mm-SW wide angle and also my Nikkor-W 300mm normal lens.
The only other modification I needed to do was remove one filter slot, and trim two thin pieces of plastic with a X-Acto knife. This allows me to pull the holder back over the lens even further. I am a big fan of the Lee Wide Angle Hood with 2 filter slots. It makes the process a heck of a lot easier.
If you are using a lens with a more normal filter size, all you need to buy is the Wide Angle Hood, and the appropriate adapter ring to attach it to your lens. I would recommend the wide angle adapter rings. They are more expensive, but well worth it for the low profile design.
Buy Lee Wide Angle Hood / 2 Filter Slots at B&H
Buy Lee 100mm Push-On Filter Holder at B&H
Filters
When shooting landscape photos on film, it is important to have a kit of filters to help in certain situations. I carry a kit of Lee graduated neutral density filters, as well as some thread-on polarizing filters for my various lenses. Though I don't use the polarizing filters as much as some people tend to, I certainly use the grad filters a lot when shooting wide scenes at sunrise or sunset, especially when working with color slide film.
This photo was taken using the help of a Lee 2 stop hard edge graduated ND filter. I waited until the foreground was in shade so the light would be soft, then used the 2 stop graduated filter to help tame the brightness of the clouds and sky that were illuminated by direct sunlight. The dark shadow along the horizon was not from the filter, but rather the shadow of an even darker cloud.
Pictured above is my most commonly used grad filter, the Lee 2 stop hard edge grad. On large format cameras, hard edge grads will behave more like a soft edge grad on a 35mm based camera.
Lee Graduated ND Filters
When using slide film to photograph grand landscape scenes, it is vital to use graduated filters to help even out a bright sky. I own 4 different grad filters from Lee, 2 stop soft edge, 2 stop hard edge, 3 stop soft edge, 3 stop hard edge. Of those filters, I find myself using the 2 stop soft, 2 stop hard, and 3 stop hard edge the most.
My general rule of thumb is that a 3 stop filter should be used if the sun is above the horizon and you are shooting toward the sun. When the sun drops below the horizon, or your composition is otherwise facing to the right or left of the sun so it isn't in the frame, you will most likely be using a 2 stop filter.
The quickest way to see if a filter is appropriate is by holding it up and looking through it with your eyes. This will help you to decide both the strength and also the transition.
You will also want to buy a special case that will hold all your filters at once. This helps to stay organized, and reduce the overall bulk of your kit. I currently use a Filter Hive Mini by Mindshift Gear.
Buy Lee Foundation Kit Filter Holder at B&H
Buy Lee 2 Stop Soft Grad Filter at B&H
Buy Lee 2 Stop Hard Grad Filter at B&H
Buy Lee 3 Stop Soft Grad Filter at B&H

This photo was taken with the help of a Circular Polarizer to help control the reflection of the sky on the slick wet sandstone. I typically avoid using polarizing filters on skies because the film I use is already very saturated.
Polarizing Filter
I reserve the use of a polarizer mostly for when I am shooting near water. This filter helps to reduce reflections off the surface of the water, as well as other subjects that reflect light in a similar way.
The filter helps to saturate colors, which can sometimes be a bit too much since I prefer to work with Velvia 50 much of the time. I avoid use of a polarizer when photographing the sky because I know that Velvia will already give the scene very strong saturation.
I own several sizes of circular polarizing filters from both Hoya and Heliopan. It is best to go with a multi-coated filter when possible. It helps to reduce internal reflections from bright subjects.
Analog Stopwatch
When I was a kid, my grandparents gave me an analog stopwatch. I don't know the story behind the stopwatch, but it is something that I have kept in a safe place all these years. When I started shooting large format film back in 2008, I immediately realized the need for a stopwatch when timing exposures that are measured in seconds or minutes. I remembered the stopwatch I had been given, and put it to use.
The action of starting and stopping an analog stopwatch is the same as starting and stopping a cable release. This helps to reduce mistakes when timing long exposures.
My Choice: Minerva stopwatch
I prefer using an analog stopwatch as opposed to an iphone app or a wristwatch because the motion to start/stop the stopwatch is the same as working a cable release. This makes it very easy on the brain when starting and stopping an exposure, especially when time is of the essence when the light is rapidly changing.
I enjoy working with the stopwatch so much that I retired the one I was given by my grandparents, and purchased a replacement on ebay. The one I use has a red and black face with 1/10 second intervals, and can time exposures up to 15 minutes in length. The watch will keep counting beyond 15 minutes, but the minute dial only goes to 15, so exposures longer than that can be made by simply adding 15 minutes to what the dial says.
If you are looking to purchase one of these analog stopwatches, check ebay. That is where I bought my replacement. I am sure there are may other great brands out there as well, but I definitely enjoy my Minerva.
Cable Release
Gepe Cable release 40"
Few things are more frustrating than when a cheap cable release breaks, and you don't have a backup. I always carry two cable releases, and make sure that each one is very high quality. Inexpensive cable releases will stretch, the cloth will fray, or they will otherwise break very quickly. I have had best luck with cable releases that are made in Germany as opposed to China. My current favorite is a Gepe brand cable release. I prefer long cable releases so I can snake them around the camera and tripod to make sure they don't get in the way of wide angle shots. My favorite is the 40", but this same cable release is available in different lengths.
This particular cable release features a disc lock, which means you can lock the shutter open without having to hold the button down. That feature can be turned on or off depending on the scene you are shooting.
This is one of the few areas with photography where even the best of the best cable releases is reasonably priced. Buy it once, and buy it right, but make sure you always carry at least 2 cable releases — just in case.
Film Loupe
Peak Anastigmatic 4x Loupe
It is important to have a high quality loupe when viewing your film on a lightbox. I have been using this loupe since 2009, and am very satisfied with the results. It is very sharp from edge to edge, and provides enough magnification to check sharpness. The viewing area is quite large, which means you have a bit more flexibility when it comes to viewing angles.
Custom Wraps & film holder cases
My Choice: Stone Photo Gear
I have purchased many products from Dan Stone through the years. He makes awesome film holder cases, as well as custom wraps for bulky large format cameras that are otherwise difficult to protect in the field.
I learned early on the importance of staying organized while shooting, and Dan's film holder sleeves play a big role in that. I purchased them in Red, Gray, Silver and Black. Each color designates a particular film stock, so there is no confusion when I am reaching for a film holder. They also help to keep the film holders clean, and protected from light while in the field.
In addition to the camera wraps and film holder sleeves, he also makes dust (and fur) covers for scanners and printers. If you have any furry friends, do yourself a favor and get a cover for your printer and scanner. Check his website below to see what he has to offer.
Camera Bag Inserts
My Choice: Tenba BYOB Cases
Many large format shooters quickly realize that traditional camera bag is no longer an ideal solution. The size and weight of the cameras make them difficult to transport. My solution is to use a traditional backpacking bag from Gregory, then use padded inserts to carry all of the small bits and pieces.
I typically carry my 8x10 lenses in a Tenba BYOB 13. It will hold my Nikkor 150mm, 300mm, 450mm, and Fujinon 600mm, all of which are in Tenba messenger wraps. Using different colored wraps allows me to better stay organized in the field.
My Meter, lens hood, cable release, stopwatch, and tripod head are carried in the medium sized Tenba BYOB 10 camera insert. Both these inserts are made of very high quality materials that will shed water, and keep the camera equipment safe while being stored in a larger bag.
There are 4 sizes of these bags available. Be sure to check the dimensions to see which will be best for you.